Sign In with AWS Cognito on iOS (without Amplify)
In the previous articles, we implemented user registration and account confirmation. Now we have registered and confirmed users in AWS Cognito, but they still can’t access the application. In this article, we’ll implement sign-in so users can authenticate and obtain their access tokens.
What are we building?
A sign-in screen that will be the main screen of the application, where the user can:
- Sign in with email and password
- Navigate to the registration screen if they don’t have an account
- Obtain authentication tokens from AWS Cognito (Access Token, ID Token, Refresh Token)
- Handle common errors (incorrect credentials, unconfirmed user, etc.)
Important Change in Navigation Flow
Until now, our app started directly on the registration screen (RegisterView). This makes sense for learning, but in a real application:
- The main screen is sign-in (
SignInView) - From there the user can go to register if they don’t have an account
- After registering and confirming, the user returns to login to sign in
The new flow will be:
App starts → SignInView (main screen)
              ↓
              ├─→ "Sign In" → Welcome screen
              │
              └─→ "Don't have an account? Sign Up" → RegisterView
                                                      ↓
                                                   ConfirmCodeView
                                                      ↓
                                                   Returns to SignInView
Prerequisites
- Have completed the previous articles (Registration and Confirmation)
- Have at least one CONFIRMED user in AWS Cognito
- Know the credentials (email and password) of a confirmed user
Step 1: Creating the Sign-In Screen
We’ll create SignInView.swift which will be the new main screen of our app. In Xcode: right-click on the project folder → New File → SwiftUI View → Name: SignInView.
import SwiftUI
struct SignInView: View {
    @State private var email: String = ""
    @State private var password: String = ""
    @State private var isLoading: Bool = false
    @State private var message: String = ""
    @State private var showAlert: Bool = false
    @State private var navigateToRegister: Bool = false
    var body: some View {
        VStack(spacing: 20) {
            // Logo or title
            Text("Welcome")
                .font(.largeTitle)
                .fontWeight(.bold)
                .padding(.bottom, 10)
            Text("Sign in to your account")
                .font(.subheadline)
                .foregroundColor(.gray)
                .padding(.bottom, 30)
            // Email Field
            TextField("Email", text: $email)
                .textInputAutocapitalization(.never)
                .keyboardType(.emailAddress)
                .padding()
                .background(Color(.systemGray6))
                .cornerRadius(10)
                .disabled(isLoading)
            // Password Field
            SecureField("Password", text: $password)
                .padding()
                .background(Color(.systemGray6))
                .cornerRadius(10)
                .disabled(isLoading)
            // Status message
            if !message.isEmpty {
                Text(message)
                    .font(.caption)
                    .foregroundColor(.gray)
                    .multilineTextAlignment(.center)
                    .padding(.horizontal)
            }
            // Sign In Button
            Button(action: {
                signIn()
            }) {
                if isLoading {
                    ProgressView()
                        .progressViewStyle(CircularProgressViewStyle(tint: .white))
                        .frame(maxWidth: .infinity)
                        .padding()
                } else {
                    Text("Sign In")
                        .fontWeight(.semibold)
                        .foregroundColor(.white)
                        .frame(maxWidth: .infinity)
                        .padding()
                }
            }
            .background(isLoading ? Color.gray : Color.blue)
            .cornerRadius(10)
            .disabled(isLoading)
            .padding(.top, 20)
            // Link to Registration
            HStack {
                Text("Don't have an account?")
                    .foregroundColor(.gray)
                Button(action: {
                    navigateToRegister = true
                }) {
                    Text("Sign Up")
                        .fontWeight(.semibold)
                        .foregroundColor(.blue)
                }
            }
            .padding(.top, 10)
            Spacer()
        }
        .padding(.horizontal, 30)
        .padding(.top, 80)
        .alert("Sign In", isPresented: $showAlert) {
            Button("OK", role: .cancel) { }
        } message: {
            Text(message)
        }
        .navigationDestination(isPresented: $navigateToRegister) {
            RegisterView()
        }
    }
    // MARK: - Sign In Function
    private func signIn() {
        guard !email.isEmpty, !password.isEmpty else {
            message = "Please fill in all fields"
            showAlert = true
            return
        }
        isLoading = true
        message = "Signing in..."
        // Simulation — will be replaced with AWS Cognito in Step 5
        DispatchQueue.main.asyncAfter(deadline: .now() + 2) {
            isLoading = false
            message = "Sign in successful"
            showAlert = true
        }
    }
}
What does this code do?
Local states: email and password store user credentials; isLoading controls the spinner; navigateToRegister triggers navigation to registration.
Key differences from RegisterView: Only asks for email and password (no confirmation field), has a «Sign Up» link instead of a «Sign In» one, and .navigationDestination navigates forward to RegisterView.
Step 2: Updating App Navigation
2.1 Update ContentView
Change ContentView.swift to start on SignInView:
struct ContentView: View {
    var body: some View {
        NavigationStack {
            SignInView()  // Changed from RegisterView() to SignInView()
        }
    }
}
2.2 Update RegisterView for Bidirectional Navigation
Add @Environment(\.dismiss) to allow returning to the login screen:
struct RegisterView: View {
    @Environment(\.dismiss) private var dismiss  // New
    @State private var email: String = ""
    @State private var password: String = ""
    // ... rest of the states
After the «Sign Up» button, add the link back to login:
            .padding(.top, 20)
            // Link to return to Login
            HStack {
                Text("Already have an account?")
                    .foregroundColor(.gray)
                Button(action: {
                    dismiss()
                }) {
                    Text("Sign In")
                        .fontWeight(.semibold)
                        .foregroundColor(.blue)
                }
            }
            .padding(.top, 10)
            Spacer()
dismiss() closes RegisterView and returns to SignInView, maintaining a clean navigation stack.
2.3 Complete Navigation Flow
App starts
    ↓
ContentView (NavigationStack)
    ↓
SignInView (main screen)
    ↓
    ├─→ Click "Sign Up" → RegisterView
    │                         ↓
    │                         ├─→ Click "Sign In" → dismiss() → SignInView
    │                         ↓
    │                      Registration OK → ConfirmCodeView
    │                                          ↓
    │                                       Confirmation OK
    │
    └─→ Click "Sign In" → (next step: home screen)
Step 3: Configure Authentication Flow in AWS Cognito
Before implementing the code, we need to configure the App Client in AWS Cognito to allow the authentication flow we’re going to use. Without this step, the code will error.
3.1 Why do we need this configuration?
AWS Cognito supports several authentication flows, all disabled by default:
- USER_PASSWORD_AUTH: User sends email and password directly to Cognito
- USER_SRP_AUTH: Uses SRP (Secure Remote Password) — more secure, password never leaves device
- CUSTOM_AUTH: Custom authentication (SMS, biometrics, etc.)
- REFRESH_TOKEN_AUTH: Obtain new tokens using the refresh token
3.2 Enable USER_PASSWORD_AUTH Flow
- Go to AWS Console → Cognito → User pools and open your User Pool.
- Click the «App integration» tab, scroll to «App clients and analytics».
- Click your App Client name, then click «Edit».
- In the «Authentication flows» section, check: ✅ ALLOW_USER_PASSWORD_AUTH and ✅ ALLOW_REFRESH_TOKEN_AUTH.
- Click «Save changes».
3.3 Understanding Token Configuration
On the same screen you’ll find the token lifetime settings. The defaults are:
| Token | Default | Purpose |
|---|---|---|
| Authentication session | 3 minutes | Max time to complete an auth flow (e.g., MFA) |
| Refresh token | 30 days | How long the refresh token is valid |
| Access token | 60 minutes | How long the access token is valid |
| ID token | 60 minutes | How long the ID token is valid |
For production, consider adjusting based on your security requirements:
| Scenario | Refresh Token | Access Token |
|---|---|---|
| Banking app (high security) | 7 days | 5 minutes |
| Corporate app | 30 days | 15 minutes |
| Social media app | 90 days | 60 minutes |
| Gaming app | 180 days | 120 minutes |
Important: If you change these values after users have already signed in, existing tokens keep their original expiration time. New values only apply to tokens generated after the change.
Step 4: Implementing the signIn() Method in CognitoAuthService
4.1 Create the Tokens Model
At the end of CognitoAuthService.swift (outside the class), add:
// MARK: - Tokens Model
struct AuthTokens {
    let accessToken: String
    let idToken: String
    let refreshToken: String
}
4.2 Implement the signIn() Method
// MARK: - Sign In
func signIn(email: String, password: String) async throws -> AuthTokens {
    guard let client = cognitoClient else {
        throw NSError(domain: "CognitoAuthService", code: -1,
                     userInfo: [NSLocalizedDescriptionKey: "Cognito client not initialized"])
    }
    let authParameters = [
        "USERNAME": email,
        "PASSWORD": password
    ]
    let initiateAuthInput = InitiateAuthInput(
        authFlow: .userPasswordAuth,
        authParameters: authParameters,
        clientId: clientId
    )
    do {
        let response = try await client.initiateAuth(input: initiateAuthInput)
        print("✅ Sign in successful")
        guard let authResult = response.authenticationResult else {
            throw NSError(domain: "CognitoAuthService", code: 4001,
                         userInfo: [NSLocalizedDescriptionKey: "Could not obtain tokens"])
        }
        let tokens = AuthTokens(
            accessToken: authResult.accessToken ?? "",
            idToken: authResult.idToken ?? "",
            refreshToken: authResult.refreshToken ?? ""
        )
        print("Access Token: \(tokens.accessToken.prefix(20))...")
        print("ID Token: \(tokens.idToken.prefix(20))...")
        return tokens
    } catch {
        print("❌ Error signing in: \(error)")
        let errorMessage = error.localizedDescription
        if errorMessage.contains("NotAuthorizedException") {
            throw NSError(domain: "CognitoAuthService", code: 4002,
                        userInfo: [NSLocalizedDescriptionKey: "Incorrect email or password"])
        } else if errorMessage.contains("UserNotConfirmedException") {
            throw NSError(domain: "CognitoAuthService", code: 4003,
                        userInfo: [NSLocalizedDescriptionKey: "User not confirmed. Check your email"])
        } else if errorMessage.contains("UserNotFoundException") {
            throw NSError(domain: "CognitoAuthService", code: 4004,
                        userInfo: [NSLocalizedDescriptionKey: "User does not exist"])
        } else {
            throw NSError(domain: "CognitoAuthService", code: 4000,
                        userInfo: [NSLocalizedDescriptionKey: "Error signing in: \(errorMessage)"])
        }
    }
}
This method uses the USER_PASSWORD_AUTH flow, extracts the three tokens from authenticationResult, and handles specific error types: incorrect credentials, unconfirmed user, and non-existent user.
Step 5: Connecting SignInView with AWS Cognito
5.1 Add States for Tokens
struct SignInView: View {
    @State private var email: String = ""
    @State private var password: String = ""
    @State private var isLoading: Bool = false
    @State private var message: String = ""
    @State private var showAlert: Bool = false
    @State private var navigateToRegister: Bool = false
    @State private var authTokens: AuthTokens? = nil  // New
    private let authService = CognitoAuthService()    // New
5.2 Display Tokens in the UI (Educational)
After the status message and before the «Sign In» button, add a section to display the received tokens:
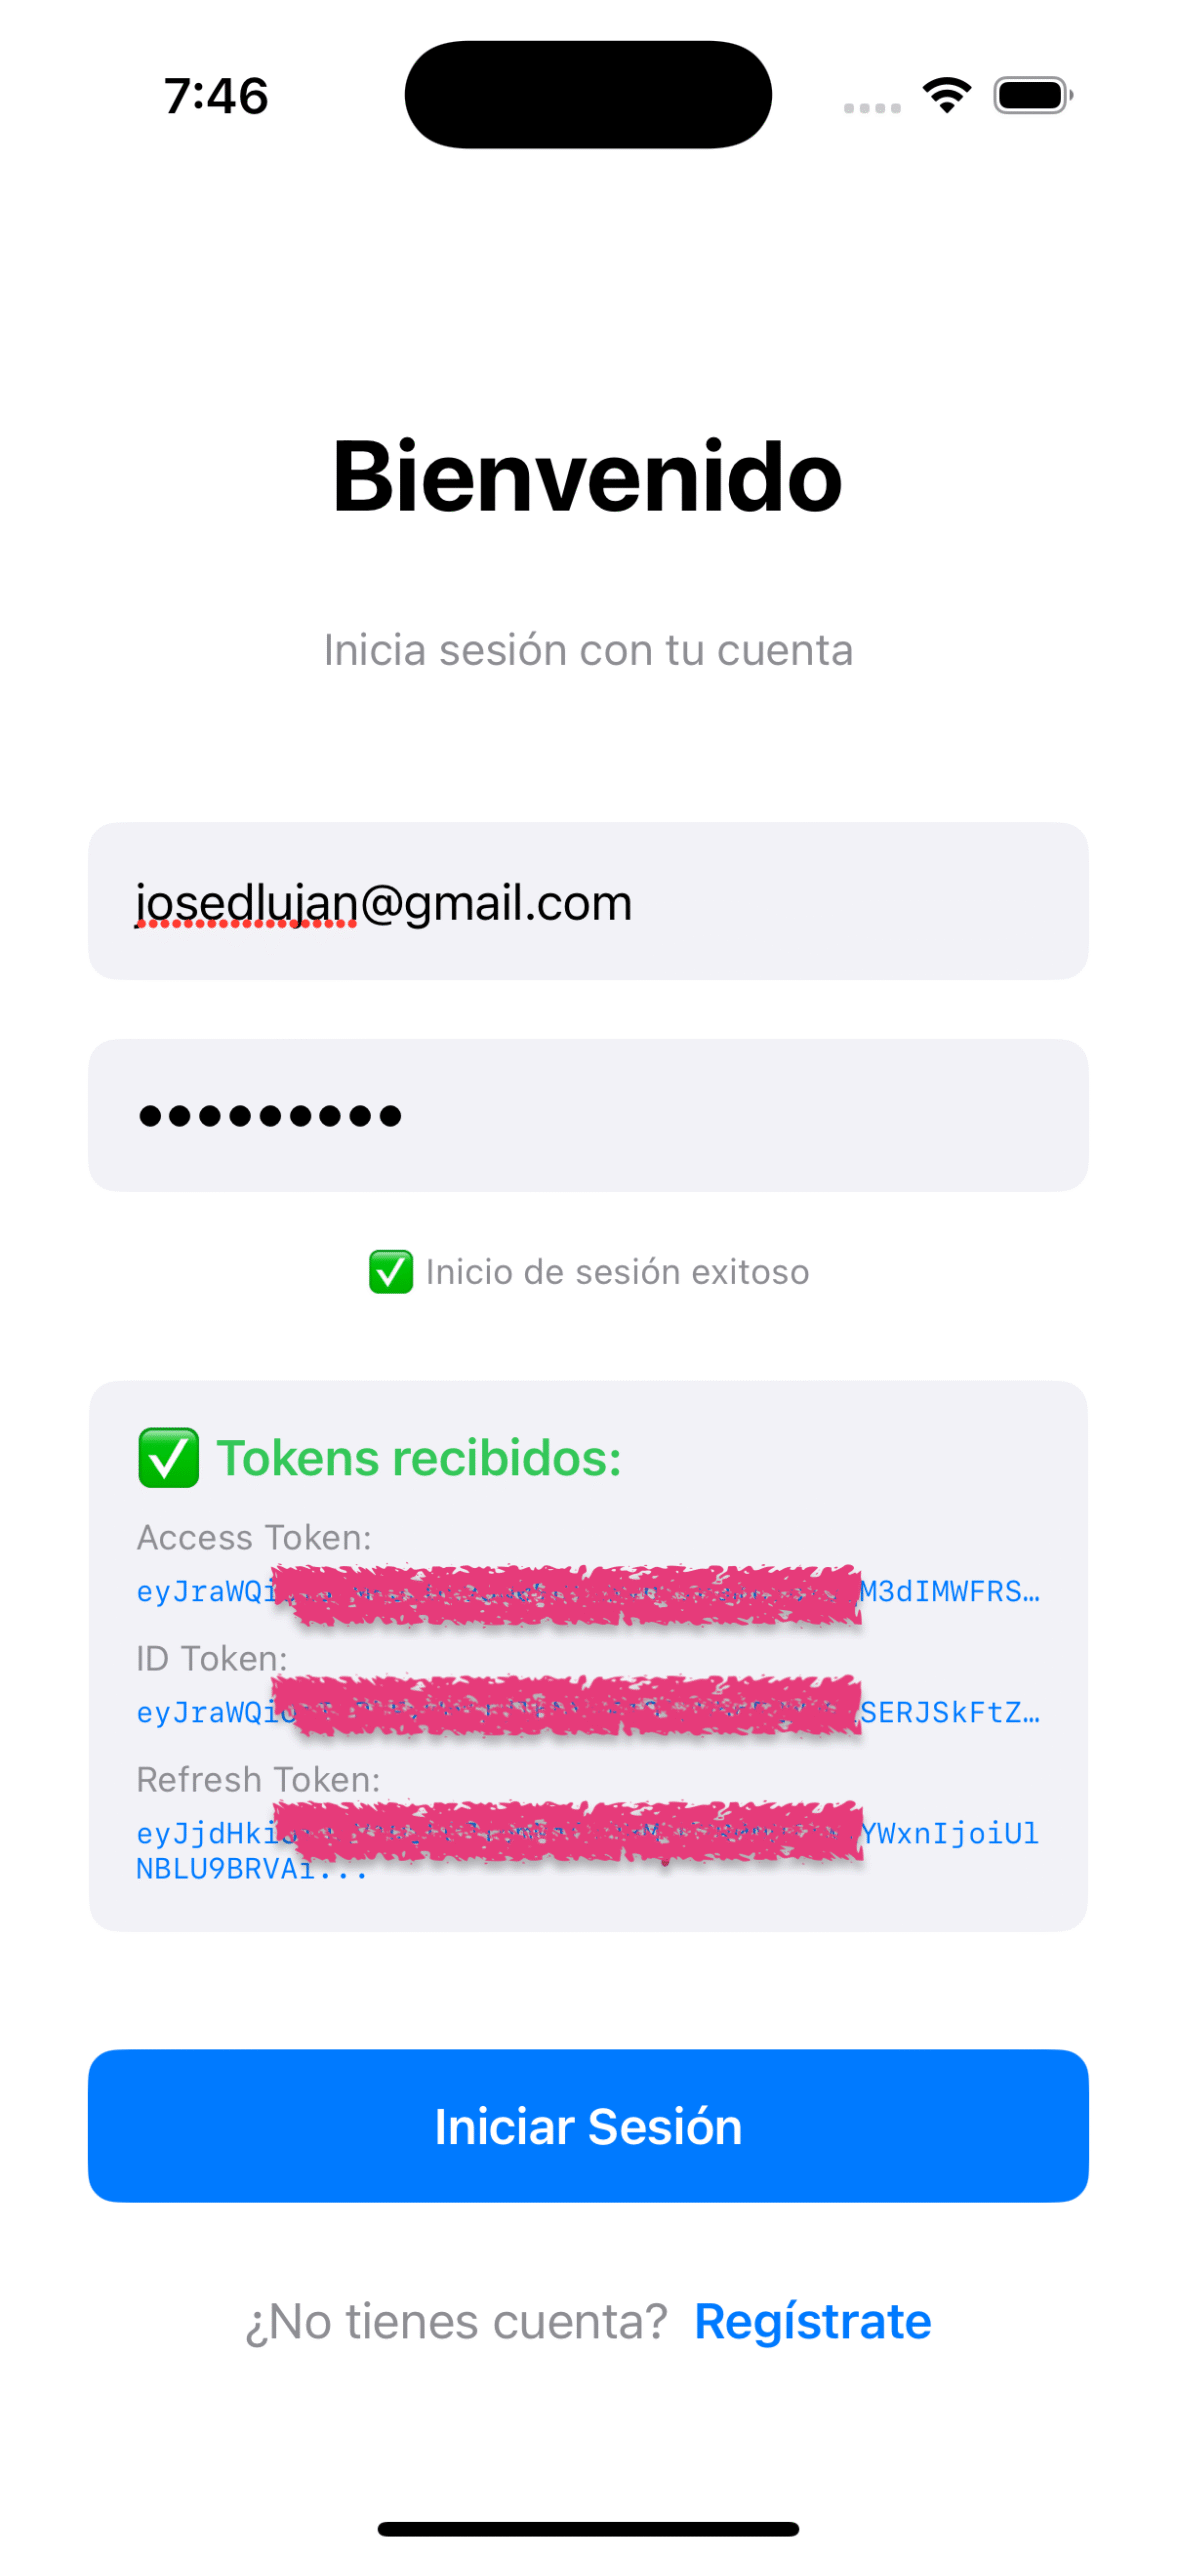
// Show tokens if they exist (educational only — never in production)
if let tokens = authTokens {
    VStack(alignment: .leading, spacing: 10) {
        Text("✅ Tokens received:")
            .font(.headline)
            .foregroundColor(.green)
        VStack(alignment: .leading, spacing: 5) {
            Text("Access Token:")
                .font(.caption).foregroundColor(.gray)
            Text(tokens.accessToken.prefix(60) + "...")
                .font(.system(size: 10, design: .monospaced))
                .foregroundColor(.blue)
            Text("ID Token:")
                .font(.caption).foregroundColor(.gray).padding(.top, 5)
            Text(tokens.idToken.prefix(60) + "...")
                .font(.system(size: 10, design: .monospaced))
                .foregroundColor(.blue)
            Text("Refresh Token:")
                .font(.caption).foregroundColor(.gray).padding(.top, 5)
            Text(tokens.refreshToken.prefix(60) + "...")
                .font(.system(size: 10, design: .monospaced))
                .foregroundColor(.blue)
        }
    }
    .padding()
    .background(Color(.systemGray6))
    .cornerRadius(10)
    .padding(.top, 10)
}
5.3 Update the signIn() Function
// MARK: - Sign In Function
private func signIn() {
    guard !email.isEmpty, !password.isEmpty else {
        message = "Please fill in all fields"
        showAlert = true
        return
    }
    isLoading = true
    message = "Signing in..."
    authTokens = nil  // Clear previous tokens
    Task {
        do {
            let tokens = try await authService.signIn(email: email, password: password)
            await MainActor.run {
                isLoading = false
                authTokens = tokens
                message = "✅ Sign in successful"
            }
        } catch {
            await MainActor.run {
                isLoading = false
                authTokens = nil
                message = error.localizedDescription
                showAlert = true
            }
        }
    }
}
Step 6: Testing the Complete Flow
6.1 Test Successful Sign-In
- Enter the email of your confirmed user
- Enter the correct password
- Tap «Sign In»
- Expected: Loading spinner → «✅ Sign in successful» → Tokens shown on screen
6.2 Test Common Errors
- Incorrect password: «Incorrect email or password»
- User doesn’t exist: «User does not exist»
- User not confirmed: «User not confirmed. Check your email»
6.3 Verify in Xcode Console
✅ Sign in successful
Access Token: eyJraWQiOiJyRzBVd...
ID Token: eyJraWQiOiJyRzBVd...
These logs confirm: connection with AWS Cognito was successful, valid tokens were received, and the tokens are JWTs (start with eyJ).
Understanding the Tokens You Received
Access Token
A temporary credential that authorizes your app to access protected resources. It’s a JWT (decode it at jwt.io) that expires after 60 minutes. Sent in every HTTP request as a Bearer token:
var request = URLRequest(url: url)
request.setValue("Bearer \(accessToken)", forHTTPHeaderField: "Authorization")
It does not contain personal user information — only scopes, username, and expiration.
ID Token
Contains user information (claims). Decode it and you’ll see:
{
  "sub": "1234-5678-90ab-cdef",
  "email": "jose@example.com",
  "email_verified": true,
  "cognito:username": "jose",
  "auth_time": 1234567890,
  "exp": 1234567890,
  "iat": 1234567890
}
Used inside the app to display user info. Do NOT send it to APIs — only the Access Token goes there.
Refresh Token
A long-lived token (30 days) used to obtain new Access and ID tokens without asking for credentials again:
1. Successful login → Receive: Access Token + ID Token + Refresh Token
2. Use Access Token in API requests → Works for 60 minutes
3. Access Token expires → App detects 401 error
4. App uses Refresh Token → Calls Cognito: "Give me new tokens"
5. Cognito returns new Access Token + ID Token
6. App continues → User does NOT need to login again
   [Cycle repeats every 60 minutes for 30 days]
Day 30 → Refresh Token expires → User MUST login again
The Refresh Token is the most sensitive of the three. Store it in Keychain, never in UserDefaults. When the user signs out, delete it immediately.
Token Usage Summary
| Token | Duration | Where used? | Purpose |
|---|---|---|---|
| Access Token | 60 minutes | HTTP requests to APIs | Authorize access to resources |
| ID Token | 60 minutes | Inside the app | Get user info (email, name) |
| Refresh Token | 30 days | Requests to Cognito | Renew the other two tokens |
Conclusion
In this article we implemented complete sign-in with AWS Cognito:
- ✅ SignInView: Main app screen with functional login
- ✅ Updated navigation: App starts on login (not registration)
- ✅ AWS configuration: Enabled USER_PASSWORD_AUTH flow
- ✅ signIn() method: Real authentication using InitiateAuth
- ✅ Token reception: Access, ID and Refresh tokens working
- ✅ Educational visualization: Tokens shown on screen to understand how they work
- ✅ Error handling: Specific messages for each error type
Now users can register (Article 1), confirm their account (Article 2), and sign in (Article 3). In the next article we’ll learn to manage these tokens securely, implement automatic refresh, and sign out correctly.
Final Reflection
I invite you to follow me on LinkedIn where I share content related to software development, best practices, and AWS technologies. You can also find me on Medium and explore my projects on GitHub. If you have questions or suggestions, don’t hesitate to connect — I’m always open to exchanging ideas and learning alongside the community.
About Validations
This article series focuses on understanding how AWS Cognito works in its purest form. In a real production project, you should consider:
- Store tokens in Keychain (never in UserDefaults or unencrypted files)
- Never show tokens in the UI
- Implement automatic token refresh
- Clear tokens on sign out and validate expiration before using them
- Use SRP_AUTH instead of USER_PASSWORD_AUTH (more secure)
- Implement MFA (multi-factor authentication)
- Rate limiting to prevent brute force attacks
- Robust password requirements (uppercase, numbers, symbols)
- Authentication event logs and monitoring
- Unit and integration testing
The goal is for you to first understand how Cognito works, and then apply development best practices according to your project’s needs.