Account Confirmation with Verification Code in AWS Cognito (iOS)
In the previous article, we implemented user registration with AWS Cognito. When registering, the user receives an email with a 6-digit code to confirm their account. In this article, we’ll implement the screen and functionality so the user can enter that code and activate their account.
As always, we’ll keep the implementation clear, simple, and accessible. We’ll focus on understanding how the confirmation process works in Cognito.
What are we building?
A confirmation screen that allows:
- Enter the 6-digit code received by email
- Confirm the code with AWS Cognito
- Resend the code if it didn’t arrive or expired
- Handle common errors (incorrect code, expired)
- Verify that the account is activated in AWS
Prerequisites
- Have completed the previous article (User registration)
- Have a registered user in UNCONFIRMED status
- Have received the email with the verification code
Step 1: Creating the Confirmation Interface
First, we’ll create a simple and clean view for the user to enter their code. Create a file called ConfirmCodeView.swift:
import SwiftUI
struct ConfirmCodeView: View {
    let email: String  // Email of the registered user
    @State private var code: String = ""
    @State private var isLoading: Bool = false
    @State private var message: String = ""
    @State private var showAlert: Bool = false
    var body: some View {
        VStack(spacing: 20) {
            // Title
            Text("Confirm Account")
                .font(.largeTitle)
                .fontWeight(.bold)
                .padding(.bottom, 10)
            // Instructions
            Text("Enter the 6-digit code we sent to:")
                .font(.body)
                .foregroundColor(.gray)
                .multilineTextAlignment(.center)
            Text(email)
                .font(.body)
                .fontWeight(.semibold)
                .foregroundColor(.blue)
                .padding(.bottom, 20)
            // Code field
            TextField("Verification code", text: $code)
                .keyboardType(.numberPad)
                .textContentType(.oneTimeCode)  // Autocomplete from SMS/Email
                .padding()
                .background(Color(.systemGray6))
                .cornerRadius(10)
                .multilineTextAlignment(.center)
                .font(.title2)
                .disabled(isLoading)
            // Status message
            if !message.isEmpty {
                Text(message)
                    .font(.caption)
                    .foregroundColor(.gray)
                    .multilineTextAlignment(.center)
                    .padding(.horizontal)
            }
            // Confirm Button
            Button(action: {
                confirmCode()
            }) {
                if isLoading {
                    ProgressView()
                        .progressViewStyle(CircularProgressViewStyle(tint: .white))
                        .frame(maxWidth: .infinity)
                        .padding()
                } else {
                    Text("Confirm Code")
                        .fontWeight(.semibold)
                        .foregroundColor(.white)
                        .frame(maxWidth: .infinity)
                        .padding()
                }
            }
            .background(isLoading ? Color.gray : Color.blue)
            .cornerRadius(10)
            .disabled(isLoading || code.isEmpty)
            .padding(.top, 20)
            // Resend code button
            Button(action: {
                resendCode()
            }) {
                Text("Resend code")
                    .font(.body)
                    .foregroundColor(.blue)
            }
            .disabled(isLoading)
            .padding(.top, 10)
            Spacer()
        }
        .padding(.horizontal, 30)
        .padding(.top, 50)
        .alert("Confirmation", isPresented: $showAlert) {
            Button("OK", role: .cancel) { }
        } message: {
            Text(message)
        }
    }
    // MARK: - Confirmation Function
    private func confirmCode() {
        guard !code.isEmpty else {
            message = "Please enter the code"
            showAlert = true
            return
        }
        guard code.count == 6 else {
            message = "Code must be 6 digits"
            showAlert = true
            return
        }
        isLoading = true
        message = "Confirming..."
        DispatchQueue.main.asyncAfter(deadline: .now() + 2) {
            isLoading = false
            message = "Code confirmed successfully"
            showAlert = true
        }
    }
    // MARK: - Resend Function
    private func resendCode() {
        message = "Code resent. Check your email."
        showAlert = true
    }
}
What does this code do?
Input parameters:
email: Receives the user’s email to display on screen
Local states (@State):
code: Stores the 6-digit code entered by the userisLoading: Controls the loading indicatormessage: Messages for the usershowAlert: Controls when to show alerts
Interface elements:
- Title: «Confirm Account»
- Instructions: Explanatory text with the user’s email
- Code field:
.keyboardType(.numberPad)for numeric input,.textContentType(.oneTimeCode)for iOS autocomplete from emails/SMS, centered font with large size - «Confirm Code» button: With spinner when processing
- «Resend code» button: In case the code didn’t arrive or expired
Basic validations: Verifies the code isn’t empty and has exactly 6 digits.
Step 2: Automatic Navigation from Registration
For the user to reach the confirmation screen after registering, we need to configure navigation so the app automatically navigates to ConfirmCodeView after a successful registration.
2.1 Update RegisterView
Add the necessary states to control navigation in RegisterView.swift:
struct RegisterView: View {
    @State private var email: String = ""
    @State private var password: String = ""
    @State private var confirmPassword: String = ""
    @State private var isLoading: Bool = false
    @State private var message: String = ""
    @State private var showAlert: Bool = false
    @State private var navigateToConfirmation: Bool = false  // New
    @State private var registeredEmail: String = ""          // New
private let authService = CognitoAuthService()navigateToConfirmation: Controls when to navigate to the confirmation screenregisteredEmail: Saves the user’s email to pass toConfirmCodeView
2.2 Add navigationDestination
At the end of the view, before the closing }, add the navigation modifier:
        .alert("Registration", isPresented: $showAlert) {
            Button("OK", role: .cancel) { }
        } message: {
            Text(message)
        }
        .navigationDestination(isPresented: $navigateToConfirmation) {
            ConfirmCodeView(email: registeredEmail)
        }
    }
}
When navigateToConfirmation is true, SwiftUI navigates to ConfirmCodeView and passes registeredEmail as a parameter.
2.3 Update the Registration Function
Modify the part where we handle successful registration:
Task {
    do {
        let result = try await authService.signUp(email: email, password: password)
        await MainActor.run {
            isLoading = false
            message = result
            // Save email before clearing
            registeredEmail = email
            // Clear fields
            email = ""
            password = ""
            confirmPassword = ""
            // Navigate to confirmation screen
            navigateToConfirmation = true
        }
    } catch {
        // ... error handling
    }
}
Now it saves the email in registeredEmail before clearing it, and sets navigateToConfirmation = true to trigger navigation instead of showing a success alert.
2.4 Update ContentView
For navigation to work, wrap RegisterView in a NavigationStack:
struct ContentView: View {
    var body: some View {
        NavigationStack {
            RegisterView()
        }
    }
}
NavigationStack is the required container for .navigationDestination to work and handles the navigation stack in SwiftUI.
Step 3: Testing the Complete Flow
Run the app in the simulator and verify each stage:
- Registration: Enter your real email, a valid password (e.g.,
1@wAs1234), confirm the password, and tap «Sign Up». - Automatic navigation: After successful registration, the app automatically navigates to
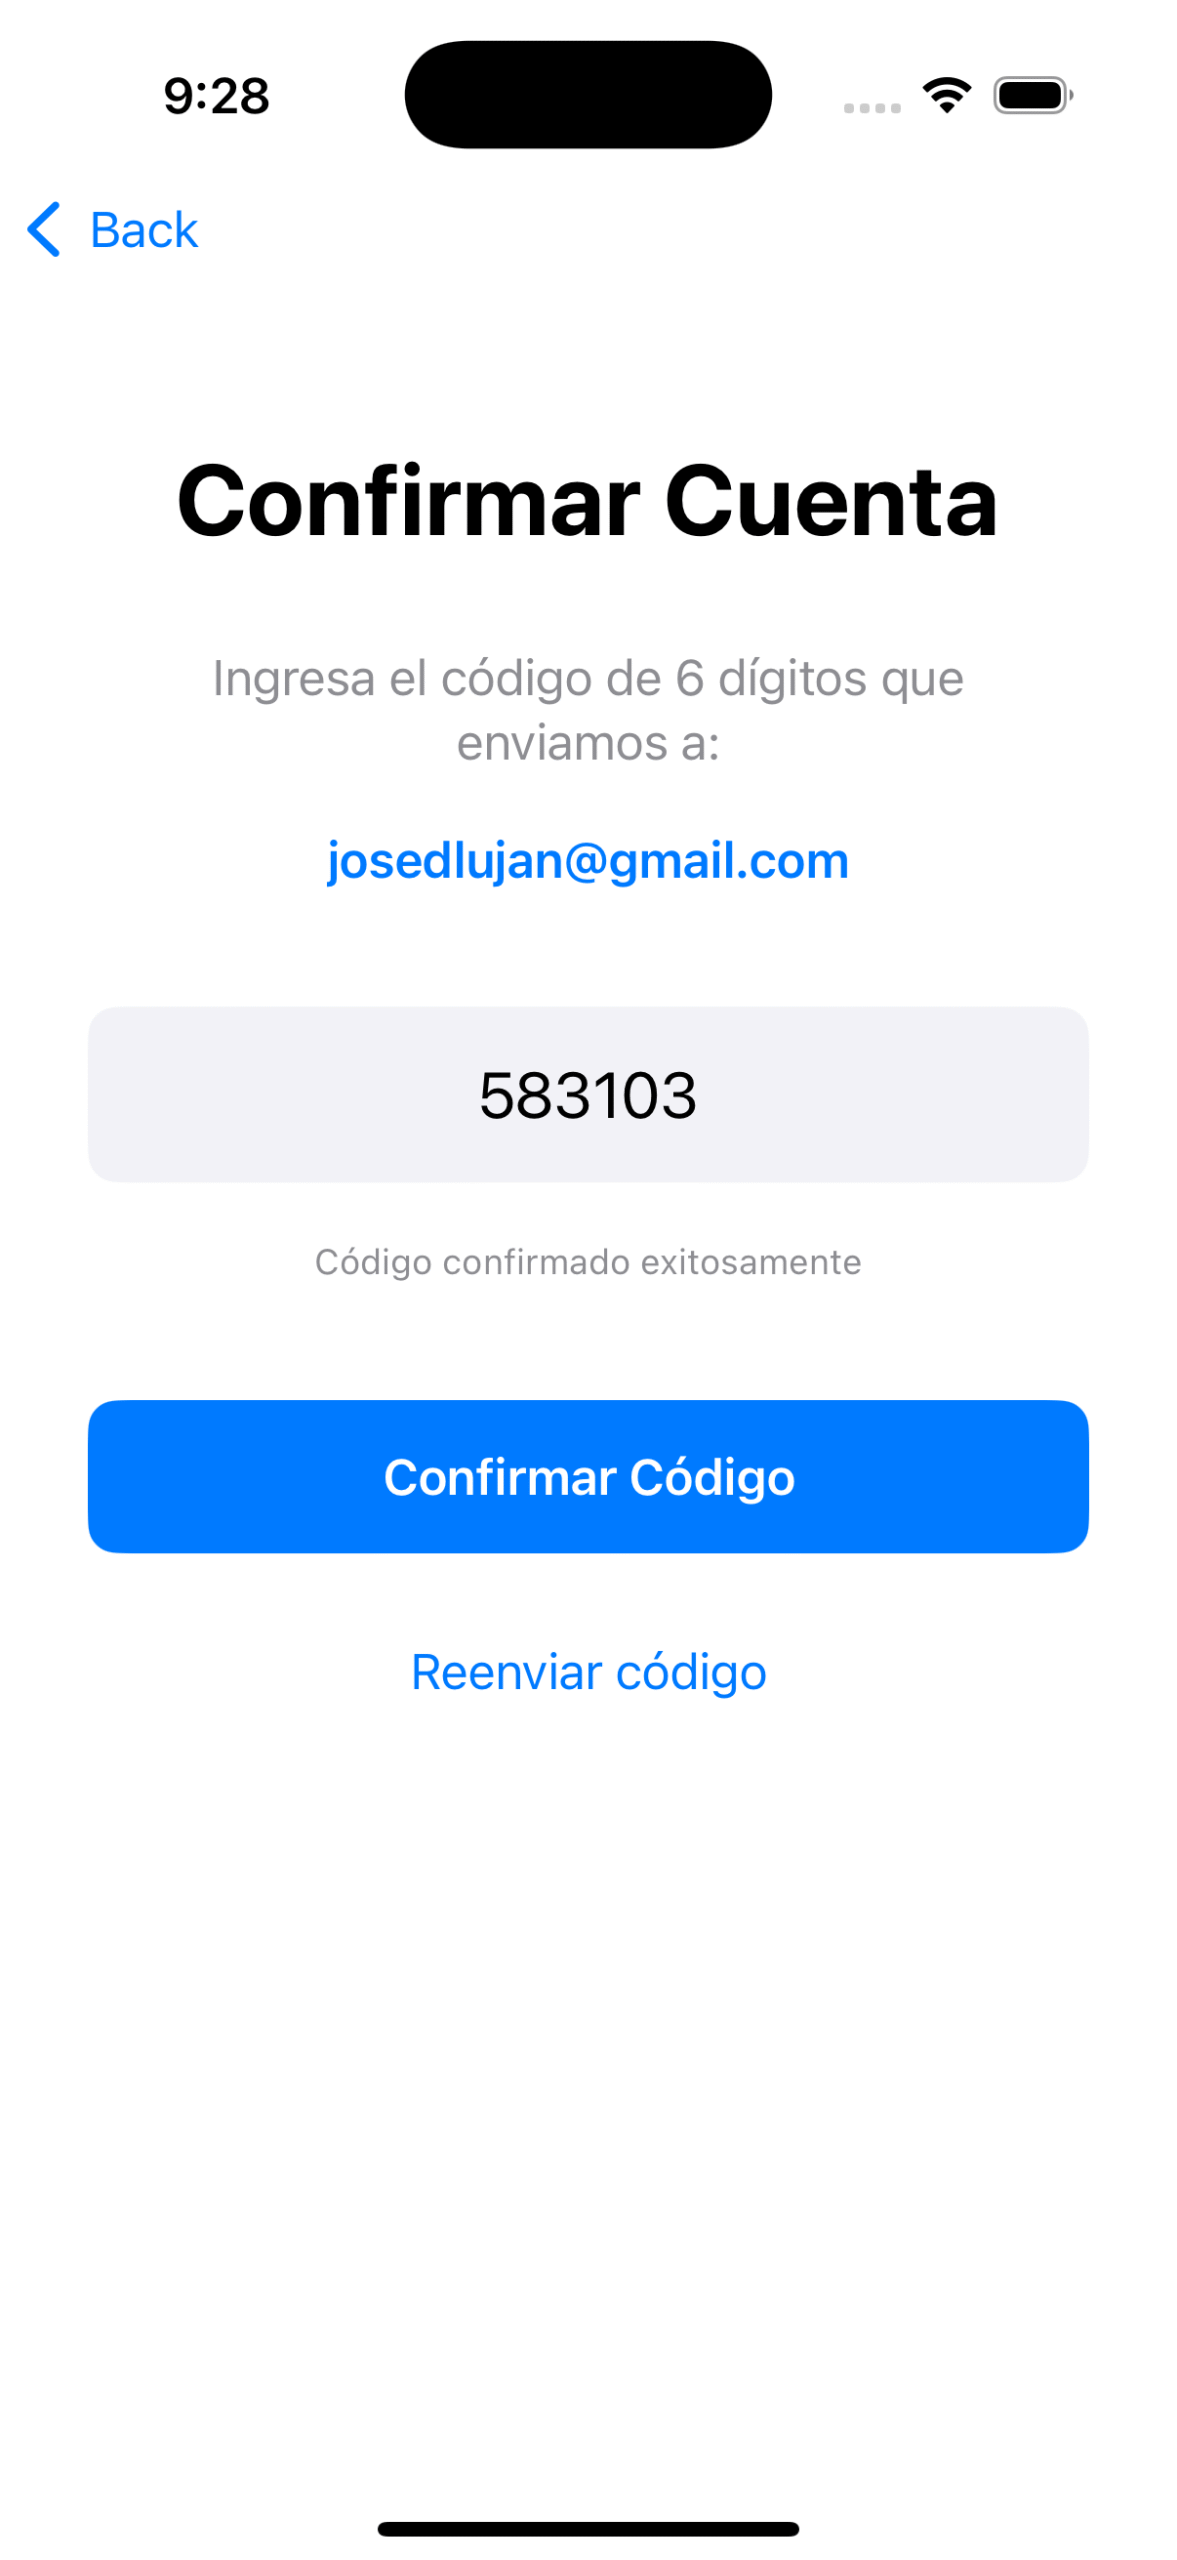
ConfirmCodeViewshowing your email on screen. - Confirmation screen: You’ll see the field to enter the 6-digit code, the «Confirm Code» button, and the «Resend code» button.
Note: At this stage, the buttons only simulate behavior (the confirmation one waits 2 seconds and shows a message). In the next step, we’ll connect them with AWS Cognito.
Step 4: Implementing Real Confirmation with AWS Cognito
Now we’ll connect the buttons with AWS Cognito to actually confirm and resend codes.
4.1 Add Methods to the Authentication Service
Open CognitoAuthService.swift and add two new methods after signUp().
Method 1: Confirm code
// MARK: - User Confirmation
func confirmSignUp(email: String, code: String) async throws -> String {
    guard let client = cognitoClient else {
        throw NSError(domain: "CognitoAuthService", code: -1,
                     userInfo: [NSLocalizedDescriptionKey: "Cognito client not initialized"])
    }
    let confirmInput = ConfirmSignUpInput(
        clientId: clientId,
        confirmationCode: code,
        username: email
    )
    do {
        let response = try await client.confirmSignUp(input: confirmInput)
        print("✅ Code confirmed successfully")
        print("Response: \(response)")
        return "Account confirmed successfully. You can now sign in"
    } catch {
        print("❌ Error confirming: \(error)")
        let errorMessage = error.localizedDescription
        if errorMessage.contains("CodeMismatchException") {
            throw NSError(domain: "CognitoAuthService", code: 2001,
                        userInfo: [NSLocalizedDescriptionKey: "Incorrect code. Verify and try again"])
        } else if errorMessage.contains("ExpiredCodeException") {
            throw NSError(domain: "CognitoAuthService", code: 2002,
                        userInfo: [NSLocalizedDescriptionKey: "The code has expired. Request a new one"])
        } else {
            throw NSError(domain: "CognitoAuthService", code: 2000,
                        userInfo: [NSLocalizedDescriptionKey: "Error confirming: \(errorMessage)"])
        }
    }
}
This method receives the user’s email and the 6-digit code, creates a ConfirmSignUpInput, calls client.confirmSignUp(), and handles specific error types: CodeMismatchException (incorrect code) and ExpiredCodeException (expired code).
Method 2: Resend code
// MARK: - Resend Confirmation Code
func resendConfirmationCode(email: String) async throws -> String {
    guard let client = cognitoClient else {
        throw NSError(domain: "CognitoAuthService", code: -1,
                     userInfo: [NSLocalizedDescriptionKey: "Cognito client not initialized"])
    }
    let resendInput = ResendConfirmationCodeInput(
        clientId: clientId,
        username: email
    )
    do {
        let response = try await client.resendConfirmationCode(input: resendInput)
        print("✅ Code resent successfully")
        print("Destination: \(response.codeDeliveryDetails?.destination ?? "N/A")")
        return "Code resent. Check your email"
    } catch {
        print("❌ Error resending code: \(error)")
        throw NSError(domain: "CognitoAuthService", code: 3000,
                     userInfo: [NSLocalizedDescriptionKey: "Error resending code: \(error.localizedDescription)"])
    }
}
This method receives the user’s email, creates a ResendConfirmationCodeInput, calls client.resendConfirmationCode(), and AWS sends a new code to the user’s email.
4.2 Update ConfirmCodeView
Add the service instance and connect the real methods. First, add authService to the view:
struct ConfirmCodeView: View {
    let email: String
    @State private var code: String = ""
    @State private var isLoading: Bool = false
    @State private var message: String = ""
    @State private var showAlert: Bool = false
    private let authService = CognitoAuthService()  // New
Then update confirmCode() to call the real Cognito method:
// MARK: - Confirmation Function
private func confirmCode() {
    guard !code.isEmpty else {
        message = "Please enter the code"
        showAlert = true
        return
    }
    guard code.count == 6 else {
        message = "Code must be 6 digits"
        showAlert = true
        return
    }
    isLoading = true
    message = "Confirming..."
    Task {
        do {
            let result = try await authService.confirmSignUp(email: email, code: code)
            await MainActor.run {
                isLoading = false
                message = result
                showAlert = true
                code = ""
            }
        } catch {
            await MainActor.run {
                isLoading = false
                message = error.localizedDescription
                showAlert = true
            }
        }
    }
}
And update resendCode():
// MARK: - Resend Function
private func resendCode() {
    isLoading = true
    message = "Resending code..."
    Task {
        do {
            let result = try await authService.resendConfirmationCode(email: email)
            await MainActor.run {
                isLoading = false
                message = result
                showAlert = true
            }
        } catch {
            await MainActor.run {
                isLoading = false
                message = error.localizedDescription
                showAlert = true
            }
        }
    }
}
4.3 Testing the Real Confirmation
Run the app and test the complete flow:
- Register with your email and a valid password, then tap «Sign Up».
- The app navigates to the confirmation screen showing your email.
- Enter the 6-digit code from your email and tap «Confirm Code».
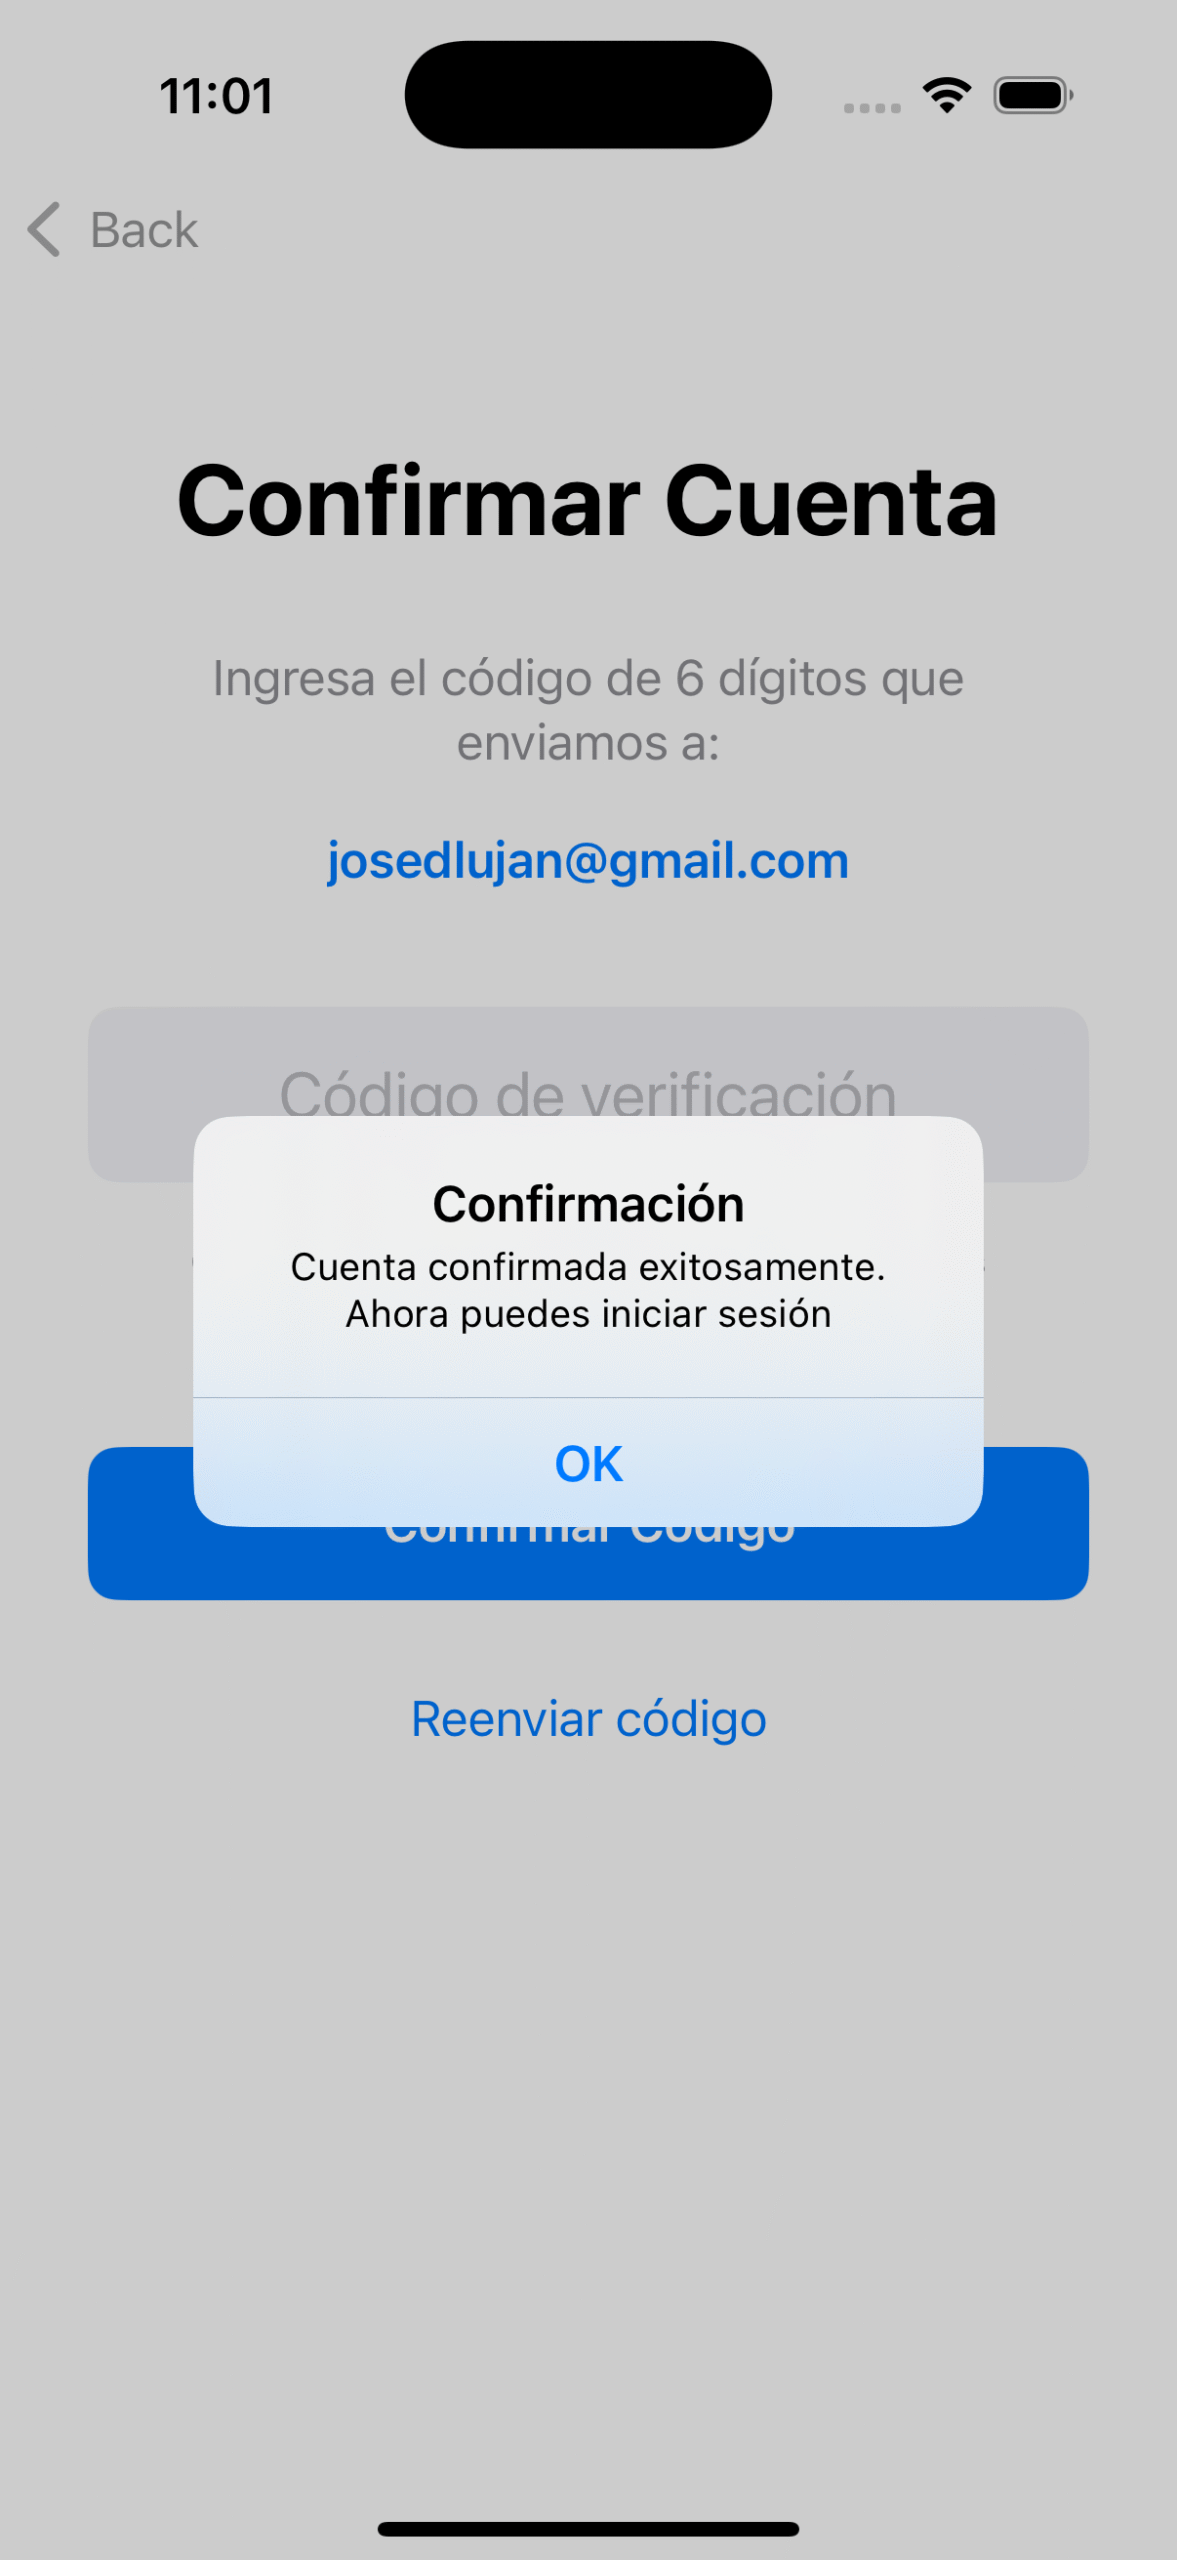
- You should see: «Account confirmed successfully. You can now sign in».
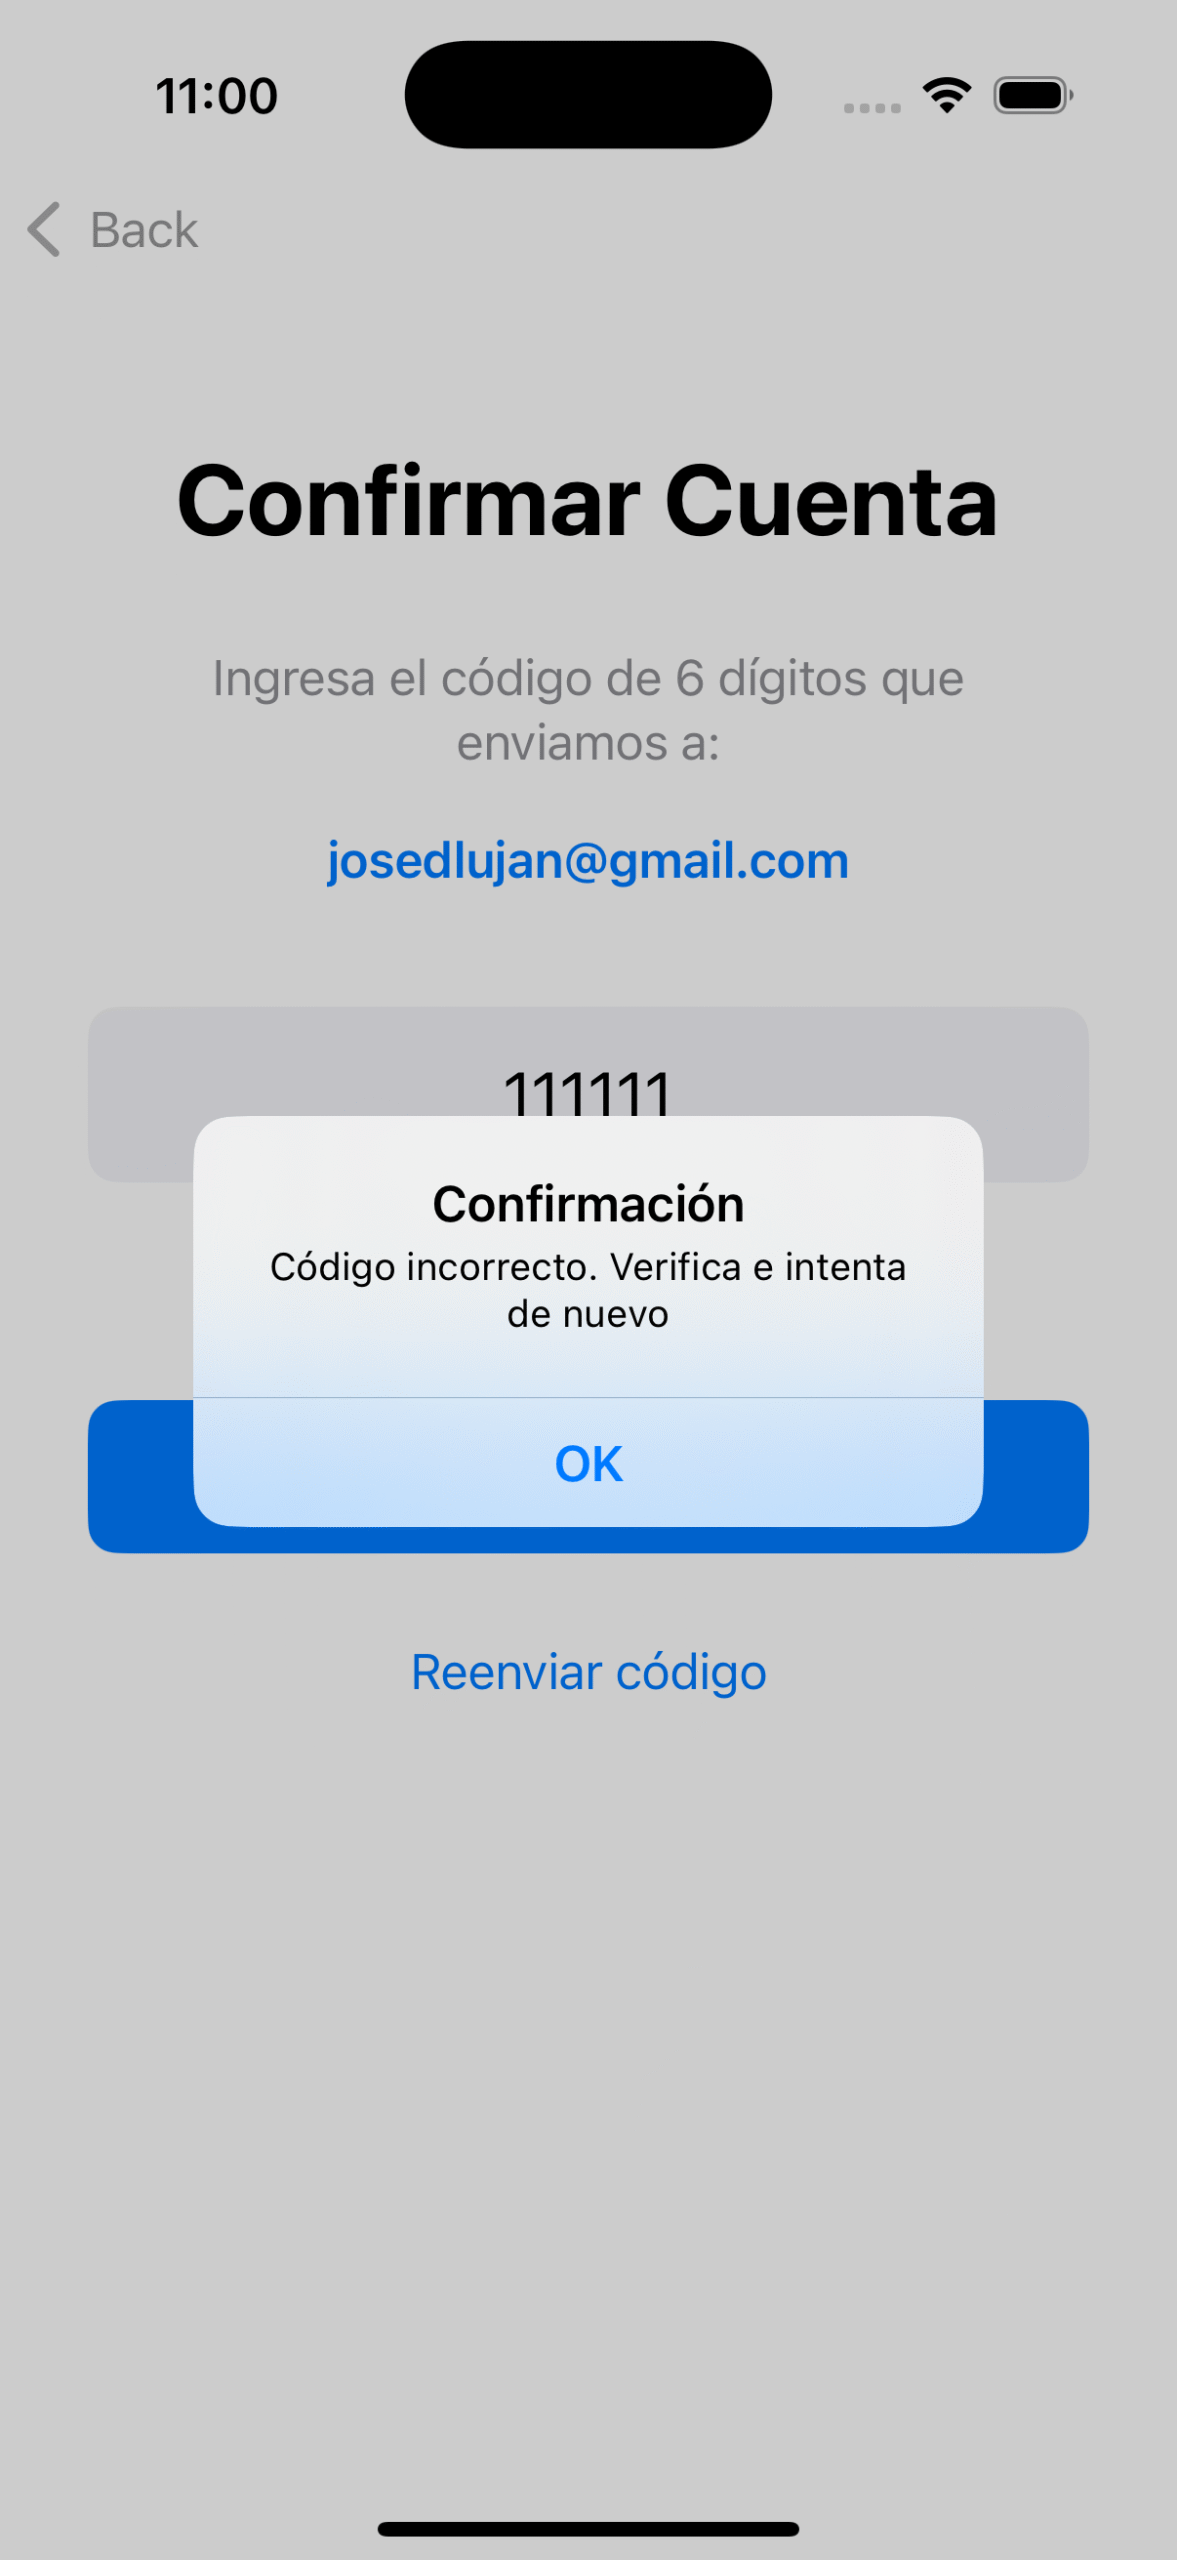
Possible errors:
- Incorrect code: «Incorrect code. Verify and try again»
- Expired code: «The code has expired. Request a new one»
4.4 Verify in AWS Console
To confirm everything worked:
- Go to AWS Console → Cognito → User pools
- Open your User Pool and go to «Users»
- Search for your user
- You should see: Account status: CONFIRMED ✅ and Email verified: Yes ✅
If it was UNCONFIRMED before, now it’s CONFIRMED. The account is activated and ready to sign in.
Conclusion
In this article, we implemented the complete account confirmation flow with AWS Cognito:
- ✅ Confirmation interface: A simple and clean screen to enter the 6-digit code
- ✅ Automatic navigation: After registration, the app takes the user directly to confirm their account
- ✅ Real confirmation: Connected the app with AWS Cognito using
confirmSignUp() - ✅ Code resending: Implemented the option to request a new code if the first one expired or didn’t arrive
- ✅ Error handling: We distinguish between incorrect code, expired code, and other errors
- ✅ AWS verification: Confirmed that the user goes from UNCONFIRMED to CONFIRMED
Now users can register and confirm their accounts completely. In the next article, we’ll implement sign-in so confirmed users can authenticate and obtain their access tokens.
Final Reflection
I invite you to follow me on LinkedIn where I share content related to software development, best practices, and AWS technologies. You can also find me on Medium and explore my projects on GitHub. If you have questions or suggestions, don’t hesitate to connect — I’m always open to exchanging ideas and learning alongside the community.
About Validations
This article series focuses on understanding how AWS Cognito works in its purest form, which is why I’ve intentionally kept validations to a minimum. In a real production project, you should consider:
- More robust email validations (format, valid domains)
- Client-side password validation before sending to AWS
- More sophisticated UI state handling (loading, success, error)
- Automatic retries in case of network failures
- Error logging and monitoring
- Network operation timeouts
- Rate limiting validation
- Credential obfuscation in code
- Secure token management
- Unit and integration testing
The goal is for you to first understand how Cognito works, and then you can apply development best practices according to your project’s needs.